Most people treat Google Maps as a simple dictionary rather than using it as a full Google Maps trip planner. They open it when they need a quick answer, get what they came for, and close it immediately.
That approach barely scratches the surface of what the tool can do for a trip.
Google does not have a dedicated trip planning tool in the way that some paid platforms do. What it has is Google My Maps, which is free, works on any device, syncs across your phone and laptop, lets you build a fully customised map with layers and notes and driving routes, works offline once you set it up correctly, and can be shared with anyone you are traveling with in about thirty seconds.
Most first-time travelers have never heard of it. Most experienced travelers who have discovered it use it for every trip they plan.
This guide shows you exactly how to set it up from scratch, how to organise it so it actually makes sense when you are standing in a foreign city trying to remember where you wanted to eat, and how to make it work with no phone signal once you are on the road.
Before you book a single hotel or plan a single day, build this map. It will show you things about your route that no amount of tab-switching and screenshot-saving will ever show you as clearly.
What Google My Maps Can Do That Regular Google Maps Cannot
Before building anything, it helps to know exactly what you are working with and where the limits are.
Regular Google Maps is built for navigation. You put in a destination and it gets you there. It is real-time, traffic-aware, and very good at the specific job it was designed for. What it cannot do is let you save a custom map with dozens of pins across multiple categories, add personal notes to each location, create layered views by day or type, or share a fully organised trip plan with someone else.
Google My Maps does all of those things. Here is a specific breakdown.
Up to 2,000 pins per map. For any realistic trip, that is more than you will ever use. You could pin every restaurant, every attraction, every accommodation option you are considering, every transport hub, and every emergency contact address and still have room.
Layers that organise by whatever system makes sense for your trip. One layer per day for a road trip. One layer per category for a city trip. One layer for things you have booked, one for things you want to find when you are there. The structure is yours to decide.
Notes on every pin. Check-in time, booking reference, opening hours, a reminder that the entrance is around the side and not on the main street, the name of the dish you read about that you specifically want to order. Whatever you need to remember, it goes in the notes field and it travels with the pin.
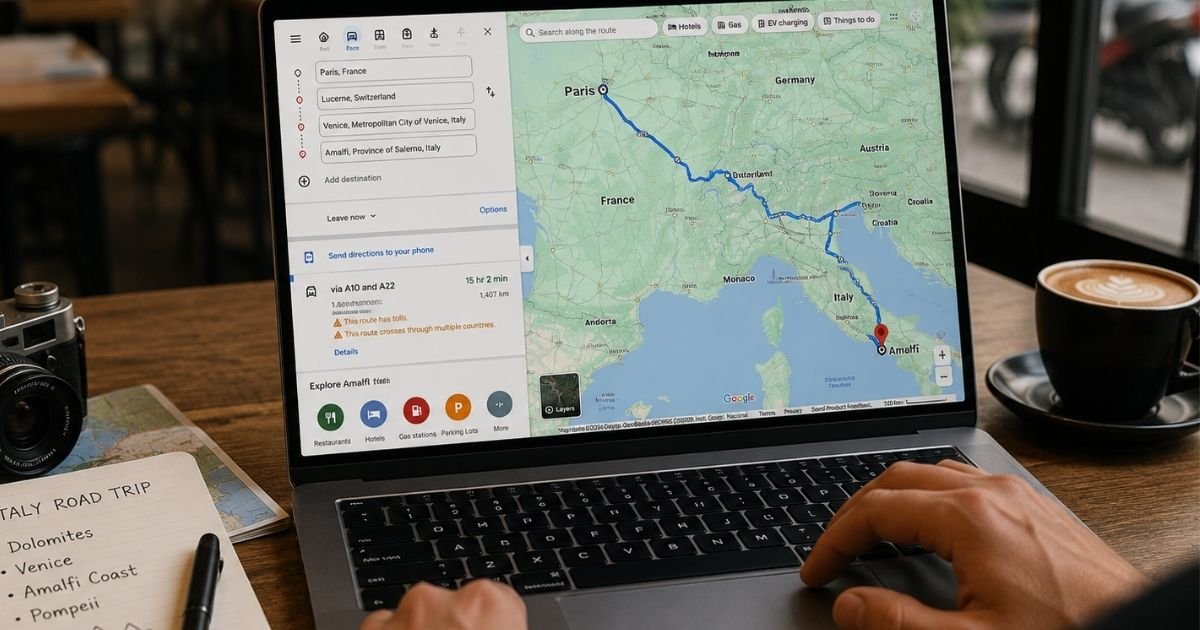
Driving routes with up to ten stops. The route draws on the map with distance and total drive time. You can reorder stops by dragging them. You can see at a glance if one day of driving is significantly longer than the others and adjust before you are committed to it.
Offline access via the Google Maps app. This requires one specific setup step that most people miss, covered in detail below. Without it, your custom map disappears the moment you lose signal. With it, your pins and notes stay visible with no connection.
Full sharing with travel partners. One link, adjustable permissions, live across all devices instantly.
Where it falls short:
Google My Maps does not automatically optimise the order of multiple stops for the fastest or shortest route. If you have ten stops and want the most efficient order, you work that out yourself or use a separate route optimisation tool. For most trips, the order is dictated by geography and personal preference anyway, so this is rarely a real limitation.
It does not integrate with booking platforms. There is no connection between your map and your accommodation reservations, flight bookings, or restaurant reservations. You add that information manually as notes on each pin.
Driving times on the map use standard estimates and do not update in real time when you are on the road. For live navigation, switch to the regular Google Maps app. Your My Maps pins appear in the regular app too once you are signed in, so the transition is seamless.
Step One: Create Your Map
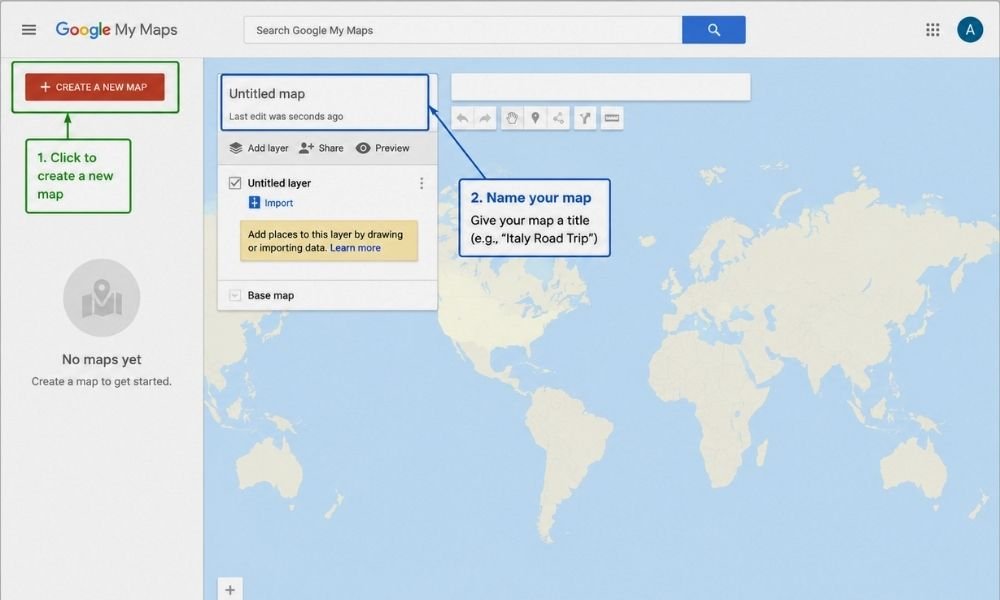
Open a browser on your laptop or phone and go to google.com/mymaps. Sign in to your Google account if you are not already signed in. You will see a button that says Create a New Map. Click it.
A blank map opens with a panel on the left side. At the top of that panel, it says Untitled Map. Click on it. A small window appears with a field for the map title and a field for a description. Give the map a name that will make sense when you look at it in six months. Something like Italy Road Trip or Portugal May or Three Weeks Southeast Asia. If you want, add a short description. Click Save.
Your map now exists. It has one layer in the left panel, also called Untitled Layer. Rename that too. Click the three dots next to it and select Rename This Layer. Name it based on your first layer category. You will add more layers in the next step.
Step Two: Set Up Your Layers
Layers are the most powerful organisational feature in My Maps and the one most people ignore. A map with no layers is just a collection of dots. A map with well-named layers is a structured plan you can navigate in the field without confusion.
For a road trip or multi-destination trip:
Create one layer per location or per day. If you are spending three days in Lisbon, two days in the Alentejo, and four days in Porto, create three layers: Lisbon, Alentejo, Porto. Each layer gets pins only for that location.
When you are in Lisbon, you turn on the Lisbon layer and turn off the others so your map is not cluttered with pins from places you are not at yet.
To add a layer, click Add Layer at the bottom of the left panel. A new untitled layer appears. Rename it immediately before you forget which one is which.
For a single-city trip:
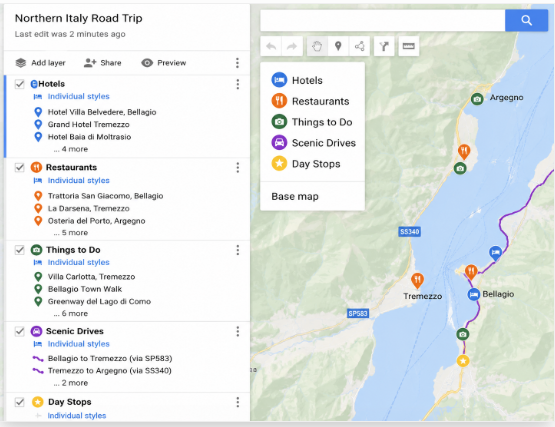
Create layers by type instead of by day. Hotels and Accommodation. Restaurants and Food. Attractions and Museums. Day Trips. Transport Hubs.
This structure lets you toggle categories on and off depending on what you need at any given moment. Looking for dinner? Turn on Restaurants only. Checking how far the museum is from your hotel? Turn on Attractions and Hotels together.
For a trip that combines both:
Do both. One set of layers by destination, and within each destination layer, use the pin colour system to distinguish categories without needing separate layers for every city. More on pin colours below.
Step Three: Add Your Pins
Make sure the correct layer is active before you start pinning. The active layer has a slightly bolder appearance and any new pin you add goes into whichever layer is currently selected. This is the most common mistake when using My Maps. Pins end up in the wrong layer because the user did not check which one was active.
To add a pin, use the search bar at the top of the map. Type in the name of the place you want to pin. When it appears in the search results, click it. A pop-up appears with basic information about the place. At the bottom of that pop-up, click Add to Map. The pin drops onto your map and the location appears in your active layer in the left panel.
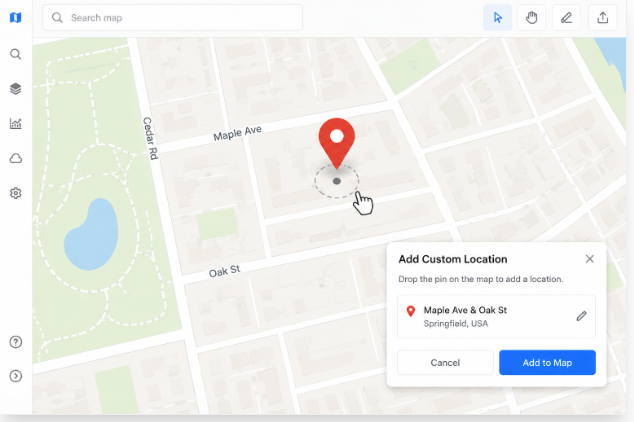
Alternatively, click directly on the map at any location. A pin drops where you clicked. This is useful for pinning a general area, a trailhead that does not have a business listing, or a specific street corner where you need to meet someone.
Do this for every location that matters on your trip. Your accommodations. The attractions you want to visit. The restaurants you have read about. The train stations and bus stops you will be using. The fuel stations on remote driving legs. The hospitals or clinics nearest your destinations if you are traveling somewhere remote or are medically cautious.
It takes longer than saving screenshots. It is worth every minute.
Step Four: Add Notes to Every Pin
This is the step that turns a visual map into an actual planning tool.
Click on any pin you have added. A pop-up appears with the location name. At the bottom of the pop-up, click the pencil icon to open the edit view. You will see two fields: a name field and a description field.
The description field is where your notes go. Put in whatever you will need when you are standing at that location or trying to decide whether to go there. Some examples of what actually belongs in these notes:
For accommodation pins: Check-in time. Check-out time. Booking reference or confirmation number. Door code if applicable. Wifi password if they emailed it in advance. The note that says key collection is from the cafe across the road, not the building itself.
For restaurant pins: Which meal you want to go for, lunch or dinner. Whether booking is required and if so the link or phone number. The specific dish you read about. Whether they accept cards or cash only.
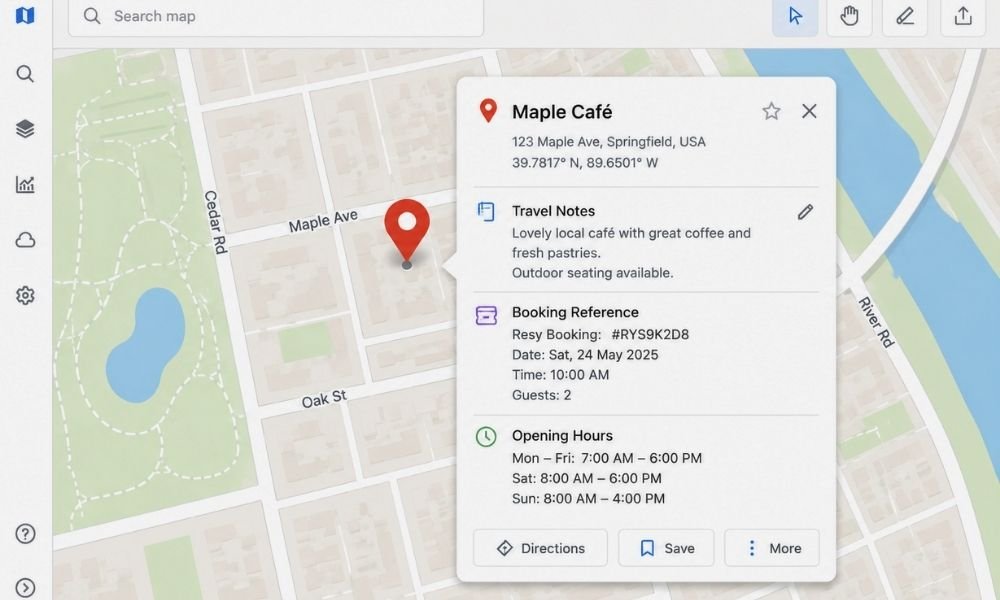
For attraction pins: Opening hours on the specific days you plan to visit, because many attractions close one day per week and it is rarely the day you would guess. Whether tickets need to be booked in advance. Approximate time you want to spend there. The note that says enter from the side street not the main gate, it saves thirty minutes of queue.
For transport hubs: Platform numbers if you know them. The note that says buy tickets from the machine not the counter. The time of the last bus or train in the direction you need.
The notes travel with the pin. They are there when you open the map on your phone in the middle of a city with thirty seconds to make a decision.
Step Five: Use the Colour System
My Maps lets you change the colour and icon of each pin. Most people leave everything as the default red marker and then wonder why their map looks like a measles outbreak.
A simple colour system makes your map readable at a glance. Here is one that works for most trips:
Blue for accommodation. Every place you are sleeping is blue. When you open the map in a new city, you immediately know where your base is.
Green for attractions and things you plan to do. Museums, viewpoints, parks, markets, anything activity-based.
Yellow for food and drink. Restaurants, cafes, bakeries worth stopping at, the market you want to browse.
Red for transport. Train stations, bus stops, airports, ferry terminals, car hire pickup locations.
Purple for anything else. Emergency contacts, hospitals, police stations, the ATM that does not charge foreign transaction fees.
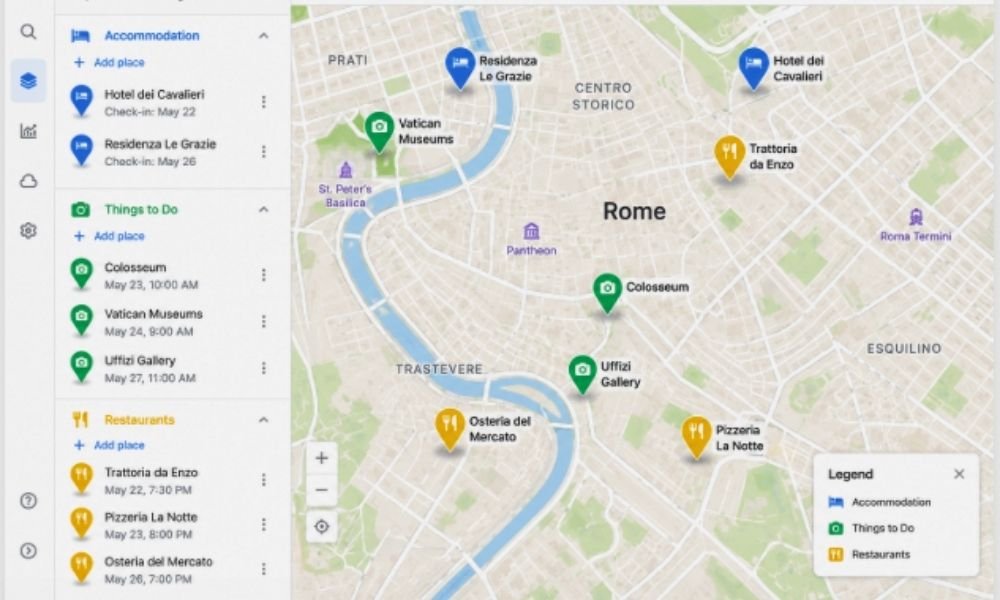
To change a pin colour, click on the pin, then click the paint bucket icon in the pop-up. A colour palette appears. Pick your colour. You can also change the icon from the default marker to a small symbol, a fork and knife for restaurants, a camera for viewpoints, a bed for accommodation. The icons are small but they add another layer of clarity on a busy map.
Step Six: Add Your Driving Route
If any part of your trip involves driving, add the route to your map now so you can see exactly how the days break down before you commit to any bookings.
Click on your first location pin. In the pop-up, look for the small icon showing a road with a directional arrow. It is usually near the bottom of the pop-up. Click it. A new layer appears in the left panel labelled Directions, and a start point is set at your first pin.
In the Directions layer, click Add Destination. Search for your next stop. The route draws on the map between the two points with the total distance and estimated drive time shown in the left panel.
Keep clicking Add Destination to add more stops. You can add up to ten stops per route. As you add each one, the map updates to show the full route and the cumulative drive time.
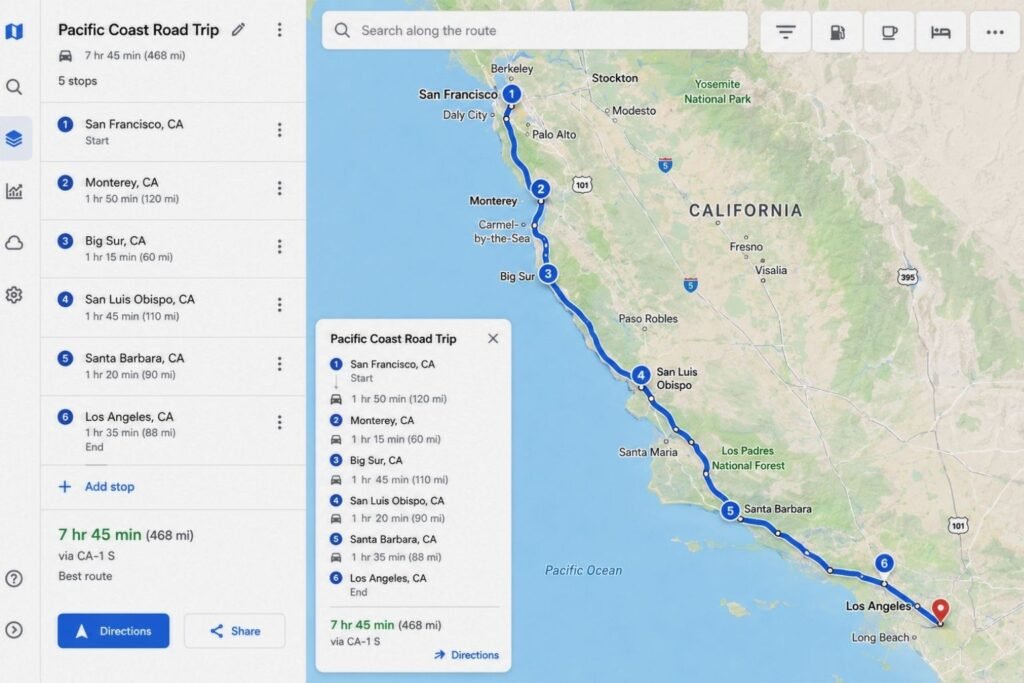
Drag the stops up or down in the left panel to reorder them. The route redraws automatically.
Look at the total drive time for each day. If one day has six hours of driving and another has ninety minutes, the trip is unbalanced. Move stops between days now, while you are still planning, rather than discovering it when you are exhausted on day three.
Click the three dots next to the Directions layer to see step-by-step directions for the full route. You can also switch between driving, cycling, and walking directions depending on your mode of transport.
Step Seven: Download Offline Maps Before You Leave
This is the step that most people skip and most regret.
Your custom My Maps map does not work offline by itself. The pins and notes are saved to your account, but the base map, the roads, the labels, the context that makes the pins meaningful, disappears without an internet connection unless you download it separately.
Open the Google Maps app on your phone. Tap your profile picture in the top right corner. Select Offline Maps from the menu. Select Select Your Own Map. A box appears over the map view. Move and resize the box so it covers your destination region. Tap Download.

The download size depends on the area. A major city takes a few hundred megabytes. A large region or country can take over a gigabyte. Do this on home WiFi before you travel, not on hotel WiFi after you arrive, and not on mobile data.
Download a separate offline map for every region you are visiting. If your trip covers three countries, download three offline maps. They stay on your phone until you delete them or they expire, which is typically after thirty days, after which Google prompts you to update them.
Once downloaded, your pins from My Maps remain visible over the offline base map even with no signal. You can tap any pin and read the notes you added. The map is fully usable with no internet connection.
Step Eight: Share the Map With Anyone Traveling With You
Click the Share button below your map title in the left panel. A window opens with sharing options.
Toggle Anyone with the Link to Viewer. This generates a link that anyone can click to view your map without needing a Google account. Copy that link and send it to whoever is traveling with you.
If you want them to be able to add their own pins, change the permission to Editor before copying the link. Editor access means they can add, move, and delete pins and change notes. Only give editor access to people you trust to not reorganise your carefully structured layers.
The shared map updates in real time. If you add a pin after sharing the link, it appears immediately on every device that has the map open. No re-sharing required.
The One Thing Google My Maps Cannot Do
Before you rely on My Maps for navigation while driving, understand one important limit.
The driving routes in My Maps are static. They do not update with live traffic, roadworks, or real-time conditions. The route you drew during planning is the route it shows, regardless of what is happening on the road when you are actually driving it.
For live navigation, use the regular Google Maps app. Your My Maps pins appear in the regular app when you are signed into the same Google account, so you can switch between them without losing your saved locations. Use My Maps for planning and reference. Use Google Maps for turn-by-turn navigation.
Frequently Asked Questions
Does Google have a trip planner?
Google does not have a dedicated trip planning application, but Google My Maps functions as one. It is free, requires only a Google account, and allows you to build a fully customised map with pins, notes, layers, driving routes, and offline access. It covers most of what paid trip planning platforms offer without any subscription cost.
Can I use Google Maps offline for travel?
Yes, but it requires a specific setup step before you leave. Open the Google Maps app, go to your profile, select Offline Maps, and download the map area for your destination. Once downloaded, the base map works without a connection. Your custom My Maps pins remain visible over the offline map. Download offline maps before you travel, on home WiFi, because the files are large.
How many stops can I add to a Google Maps route?
Google My Maps allows up to ten stops per route layer. If your trip has more than ten stops, create multiple route layers, one for each section of the trip. Each layer can hold its own ten-stop route.
Can I share my Google Maps trip plan with someone else?
Yes. In Google My Maps, click Share below your map title, enable link sharing, and copy the link. Anyone with the link can view the map. You can change the permission to allow editing if you want travel partners to add their own pins.
Is Google My Maps the same as Google Maps?
They are related but different. Google Maps is a navigation app built for real-time routing and directions. Google My Maps is a separate tool for building custom maps with saved pins, notes, layers, and shared access. Google My Maps is found at google.com/mymaps and is not the same interface as the regular Google Maps app.
What should I put in the notes field on each pin?
Anything you will need when you are at that location without reliable internet. For accommodation: check-in time, booking reference, door code. For restaurants: whether booking is required, cash or card, the dish you want to try. For attractions: opening hours for your specific travel day, whether tickets need advance booking, which entrance to use. For transport hubs: platform numbers, ticket-buying instructions, last service times. Think of the notes field as the information you would otherwise be searching for on a slow hotel WiFi connection at 9 p.m. the night before.
Wandervoyant earns a small commission from qualifying purchases made through affiliate links on this page at no additional cost to you.
Related reading: